

First of all, I cut a notch on each side of the inner nose in order for the tray to be blocked in position. I liked this way to do, nice design !
The plywood tray is cut to perfectly fit the inner nose, and host the ballast tube. But holes for the servos, receiver and battery are not cut, which I like because you can optimize the layout depending of the servos you use.
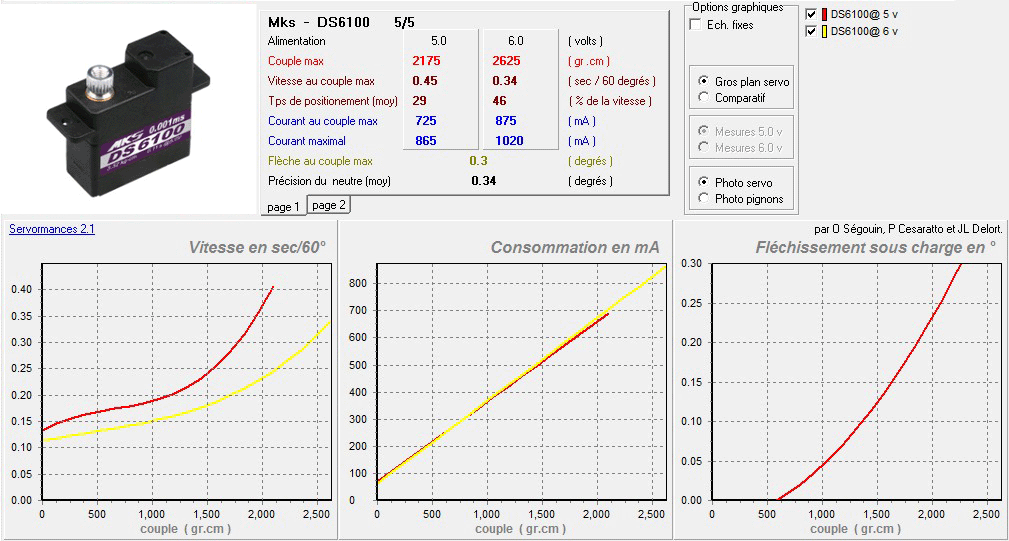
For the elevator, I decided to use the excellent and tiny MKS DS6100 servos which is very powerful for it's size, perfect for a V-tail of a F3X plane.
I also cut the holes for the Jeti R8 receiver and a battery that could be in my case 4x eneloop cells (AA size).
The tray is reinforced here and there with a piece o additional plywood.
The servos tray is then glued in place, using 10 minutes epoxy, and after sanding the inner nose surface to maximize the fixing. Once dry, I used a layer of 163g/m2 fiberglass and some carbon rowing on each side of the tray, with epoxy resin, to make the fixing of the tray nearly undestructible.
Then come the installation of the ballast tube. This stage needs attention in order to position it perfectly to avoid the CG to move when ballasting. The dimension of the ballast tube depends on:
location of the CG: I choose 103mm
The distance between the CG and the front end of the tube, considering that the last slug is to close an secure the ballast.
If necessary, cut the tube a bit, then, whit the mini drill, open the front end to ease the extraction of the slugs. I have chosen to secure the ballat with a bolt, so I installed a nut below the ballast tube, in a small block of samba wood. I encourage you several dry assembly of th tube and the inner nose to check that everything fit well, that the rear end of the ballast tube is in contact with the bottom of the fuselage, once in place.

If everything is fine, then you can fix the ballast tube on the servos tray. I did it in 2 steps: First with some 10 mn epoxy, then later with some black Sikaflex 11FC+ which is a elastic joint sealant and multipurpose adhesive based on polyurethane, not silicone.
The sealant is pretty strong, even if it remains flexible with time. Some modellers use it to glue servos in the wings. I usually don't do it because the fixing is so strong that you cna damage the wing if you want to rmove the servos from the wing. But for a ballast tube that will contain about 1kg of ballast, this sealant is perfect.
Next time, I will glue the inner nose + servos tray + ballast tube in place, and start the servos installation in the wings.
Stay tuned !